AMARYLLIS–the word itself rolls its syllables over the tongue! As a flower, its glorious winter blossoms brighten up the doldrums of winter! Its very name is derived from a Greek root that means “to sparkle.” How appropriate!
Variety Galore
The botanical name for what we commonly refer to as amaryllis is Hippeastrum, a genus that has an extensive number of species and cultivars. They come in shades of red, pink, white, and orange, and in variegations of all those colors. They also are available in a range of sizes, growing from 12 to 36 inches, depending on the species, the initial size of the bulb and growing conditions.
You can purchase an amaryllis already in bloom, or you might prefer to plant a bulb yourself to delight in watching it as it develops, since they are quite easy to grow. You simply need bright light, a well-draining potting soil, warmth and moisture. Amaryllis is native to much warmer climates than Wisconsin, so be sure to protect bulbs and plants from freezing.
Plant individual bulbs in the container of your choice. There are specific terra cotta bulb pots, but you may use plastic or ceramic as well, as long as whatever you choose has good drainage. Amaryllis bulbs are quite large, so make certain that your container is at least one inch larger than the widest part of the bulb. For one bulb, a six-inch diameter pot should suffice. If you choose to plant a handsome grouping of three bulbs, use a twelve-inch pot. The pots do not have to be deep. In fact, most bulb pots are fairly shallow.
Partially fill the container with moist soil. Place the bulb on that soil with the pointed end up, then add additional soil, gently firming it around the bulb. Leave one-third to one-half of the bulb exposed.
Keep the soil moist, but not too wet. If all goes well, and it should, your amaryllis should bloom six to eight weeks after planting. If the stem is particularly tall, you may need to stake it up, but be careful not to injure the bulb or the roots when inserting the stake into the soil.
To live and bloom again
There is no need to discard your amaryllis after blooming. If you take the proper care, you may enjoy multiple years from your bulbs. Wait until the flowers fade, then cut the spent blooms off with a sharp instrument. Leave the leaves, as they will absorb light and help the bulb to regain nourishment through photosynthesis. Treat it as you would a houseplant– water, warmth, and bright indirect light.
Take the recuperating plant outside in the summer to soak up the sunshine, being careful to harden the plant off before exposing it to the natural elements. While it enjoys its time outside, continue to protect it from the harshest sunlight and heat. Water and fertilize it as you would any house or garden plant with an all-purpose NPK (nitrogen/ phosphorous/potassium) ratio of 10-10-10.
Near the end of summer, late August, or early September, cease watering and fertilizing to force the plant into dormancy. Let the foliage die back and be sure to bring the plant indoors before the first frost. Pull the bulb out of the soil, let it dry and store it in a dry, dark, cool place for about two months.
About six to ten weeks before you want to enjoy a new and beautiful blossom, repot the bulb in fresh potting soil. Water it well to break its dormancy. Then you are back to the initial steps to care for a developing amaryllis.
As new growth develops, switch to a fertilizer lower in nitrogen such as Jack’s Blossom Booster (10-30-20). Nitrogen is great for green grass, but too much nitrogen given to a blooming plant will encourage leaf growth at the expense of flowers.
Commonly, you will see amaryllis kits that include a bulb, the growing medium and a plastic or ceramic container. If you have purchased or received a kit, simply follow the included instructions.
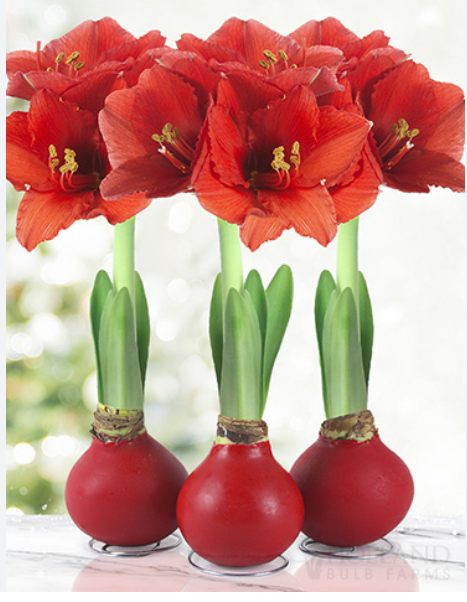
For a spectacular gift for a friend, or for yourself, bulbs that are encased in wax make a dramatic statement! Waxed Bulbs need no special care other than bright light, warmth, and a table on which to sit that will highlight the blossoms’ beauties. Another option is to place the waxed bulb in a glass container on a bed of decorative stones or colored glass. They do not need to be watered at all, since the wax seals in whatever the bulb needs to develop.
Generally, waxed amaryllis are considered to be a once-and-done delight because that same seal prevents the bulb from forming roots, and as the leaves and blooms develop, they take stored up nourishment from the bulb. However, if you revel in a challenge, you may be able to revive the bulb to live and to bloom another season. Success is not guaranteed, but it might be fun. Very carefully peel, or cut away the wax from the bulb. There may be a plastic or cellophane wrapper between the wax and the bulb. Remove that as well. The bulb will look quite desiccated, but treat it as you would any other amaryllis bulb that has finished its bloom.